
Get Started
What we build?
Once everything is connected, your onboarding process looks like this:
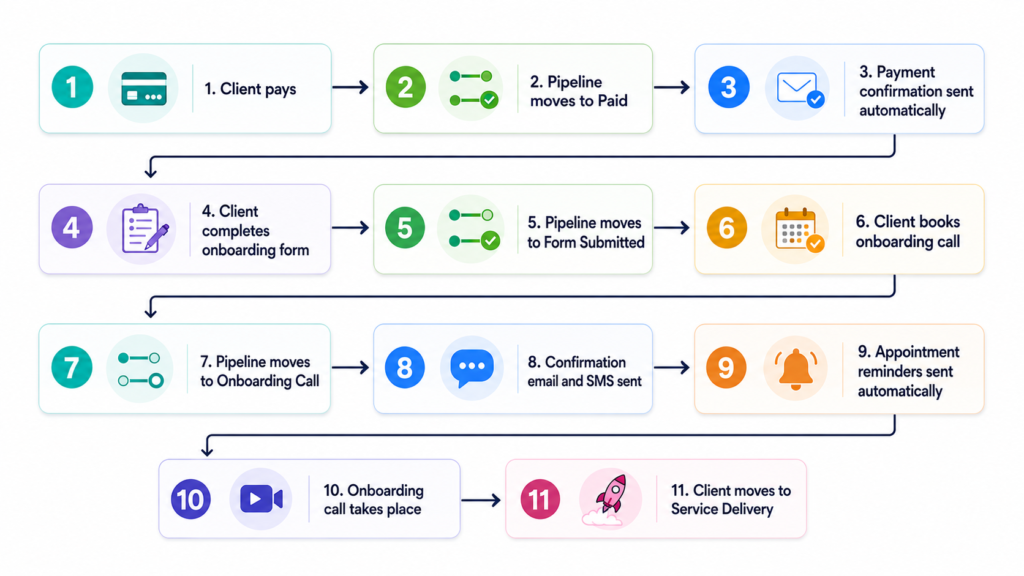
This gives you a simple, repeatable onboarding system that can run with very little manual intervention.
Instead of chasing every new client individually, GoHighLevel handles the repetitive parts for you.
You only need to step in when human interaction is actually necessary.
A complete client onboarding system that handles:
- Payment collection
- Client information collection
- Onboarding forms
- Appointment scheduling
- Pipeline management
- SMS and email confirmations
- Client onboarding workflows
Prepare:
You need a GoHighLevel account to follow all of these steps, if you don't have an account yet, sign-up trial here.
Step 1: Create Your Client Onboarding Form
Before thinking about funnels, calendars, or automations, the first thing you need is a simple onboarding form.
This form should collect all the information you need to set up the client’s account and deliver your service.
Inside GoHighLevel, go to:
Sites → Forms → Create New Form → Start From Scratch → name it something such as “Onboarding Form”
I recommend making all important fields required.
Depending on your service, your onboarding form can collect much more information.
The goal is simple:
Collect everything you need once so you do not have to keep asking the client for missing information later.
1.1 How to Create Custom Fields in GoHighLevel
Your GoHighLevel account may not already contain every field you need.
To create additional fields, click:
Add Object Fields → Add
Choose: Dropdown Single. Then click Next.
Add your options one by one.
For the field group, you can usually use something like: General Info. Then click Save.
For fields such as Legal Business Name, use a Single Line field.
Then select the General Info group and save the field.
Repeat this process for every piece of information you need from the client.
Quick Form Design Hack
If you want to visually separate different sections of your onboarding form, you can create a simple divider.
Scroll through the available form elements until you find the Text element.
Drag it into the position where you want the divider.
Replace the text with: (three underscore)
___
Then center the text and adjust the font weight.
It creates a simple visual separator between different sections of your form and makes longer onboarding forms easier to read.
Step 2: Create Your Onboarding Call Calendar
Before building the onboarding funnel, create the calendar clients will use to book their onboarding call.
Once a client pays and submits their information, you may need to schedule a call with them.
For example, during that onboarding call you might help them:
- Log into the system
- Connect Google
- Connect Facebook
- Connect Instagram
- Connect Google Business Profile
- Configure integrations
- Understand how to use your service
Before creating the calendar, make sure you have added yourself as a user inside the sub-account.
Go to:
Settings → My Staff → Add User
Enter your information and create the user.
After that, go to:
Calendar Settings → Connections
Here you can connect services such as:
- Google Calendar
- Google Meet
- Zoom
Once your connections are ready, go to:
Calendars → New Calendar
Choose:
Personal Booking
Name the calendar something like:
Onboarding Call
Select yourself from the list of users.
Then open Advanced Settings.
Scroll down to the meeting location and select either:
- Zoom
- Google Meet
Now clients will automatically receive the correct meeting information when they book their onboarding call.
Step 3: Build the Client Onboarding Funnel
Now you can build the funnel that guides the client through the onboarding process.
Instead of manually sending different links, you can send clients one onboarding funnel and let them complete each step in order.
A simple onboarding funnel can contain four steps:
- Payment
- Onboarding Form
- Onboarding Call
- Thank You Page
Let’s look at each one.
Funnel Step 1: Payment Page
The first page should collect payment.
For example, imagine you sell an consultant service for:
$197 per month
To create the product, leave the funnel and go to:
Payments → Products → Create Product
Give the product a name.
The description is optional.
Scroll down to the pricing section.
If the service is billed monthly, change the price type to:
Recurring
Then configure:
- Monthly price
- Setup fee, if applicable
- Billing frequency
In many cases, it is better to collect payment upfront instead of offering a trial.
Getting payment immediately confirms the client's commitment and reduces the chance that you spend time onboarding someone who never becomes a paying customer.
Once the product is configured, click Save.
Now return to:
Sites
Open your payment page.
Click:
Products → Add Product
The product you just created should appear in the list. Select the product and its price.
Click Save.
If you open the payment form again, it should now display the correct product name and price.
A Useful Sales Tip
If you are closing a client on a demo or sales call, try to collect the payment during the call.
Once the client has agreed to move forward, sending them away to “think about paying later” creates unnecessary friction.
Collecting payment immediately allows the onboarding process to begin while the client's intent is still high.
Funnel Step 2: Onboarding Form
The second page should contain the onboarding form you created earlier.
Immediately after the client pays, redirect them to this page.
They can then submit all the information your team needs to launch their account.
Once the form is submitted, send them automatically to the next step
Funnel Step 3: Book the Onboarding Call
The third page contains your onboarding calendar.
Clients can choose an available time for their onboarding call.
During this call, you can:
- Show them how to use your service
- Answer questions
- Verify account access
- Configure integrations
- Connect Facebook pages
- Connect Instagram
- Connect Google Business Profile
- Make sure everything is working correctly
By putting the calendar directly after the onboarding form, clients can complete everything in one session.
Funnel Step 4: Thank You Page
The final page is the thank-you page.
If you are using GoHighLevel SaaS Mode and your SaaS setup is configured correctly, the client's account may already be automatically created at this point.
Your thank-you page can provide instructions such as:
- How to access the platform
- Where to log in
- What happens next
- What they should prepare for the onboarding call
- Support information
- Links to training resources
This gives the client a clear next step instead of leaving them wondering what happens after completing the funnel.
Step 4: Create an Onboarding Pipeline
Now you need a pipeline that shows exactly where every client is in the onboarding process.
A simple onboarding pipeline might contain stages such as:
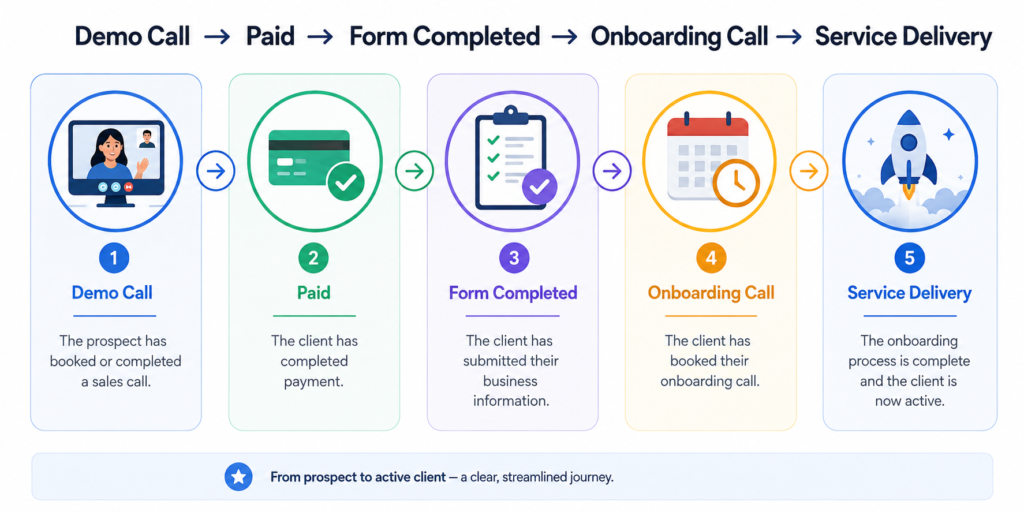
To create your pipeline, go to:
Pipelines → Create Pipeline
Name it:
Onboarding
Then create your pipeline stages.
You can copy the structure above or adjust the stages based on your specific client onboarding process.
Handling Custom Pricing and Client Contracts
Sometimes you do not have one fixed product price.
You may negotiate custom pricing with each client.
In that case, you can create a custom recurring product during or immediately after the sales call.
For example, after agreeing on a price with a client:
Go to:
Payments
Create a new monthly recurring product using the agreed price.
Then create a recurring invoice.
Select the product.
Select the customer.
Scroll down and modify the client information if necessary.
You can also include your agreement or terms and conditions directly inside the invoice.
For example, you can state that:
By paying the invoice, the client agrees to your terms and conditions.
Then send the invoice to the client by email.
Once the client pays, you can send them the onboarding link.
This approach can sometimes simplify the onboarding process because the payment itself records acceptance of the terms.
Depending on your business and jurisdiction, however, you should make sure your contract and acceptance process meets the legal requirements that apply to you.
Step 5: Create the Onboarding Automations
Now we get to the most important part:
Automation.
There are three main workflows needed for this onboarding system.
Workflow 1: Paid
The first automation can simply be called:
Paid
The trigger occurs when someone submits your order form.
Once that happens, the workflow should:
- Update the client's pipeline stage to Paid
- Send a payment confirmation
- Wait one hour
- Check whether the onboarding form has been completed
- Send a reminder if necessary
For example, the confirmation message could say:
“Thank you. We've received your payment. Please continue with the remaining onboarding steps.”
After sending the confirmation, add a one-hour wait.
The purpose of this delay is to catch clients who paid but never completed the onboarding form.
If they have not submitted the form after one hour, you can automatically remind them.
That means you no longer need to manually check who has paid and who still owes you information.
Workflow 2: Onboarding Form Submitted
The second automation can be called:
Onboarding Form Submitted
The trigger is:
The client completes the onboarding form.
As soon as this happens, remove the client from the first Paid workflow.
This is important because the first workflow contains the delayed reminder asking them to complete their onboarding form.
If they already submitted the form, you obviously do not want that reminder to be sent.
Next, update their pipeline stage to:
Form Submitted
Then add another one-hour delay.
This time, the automation checks whether the client has booked their onboarding call.
If they submitted the form but still have not booked the call, send them a reminder.
You can use both SMS and email.
The message should simply direct them back to the onboarding calendar.
The logic now becomes:
Paid → Complete Form → Book Call
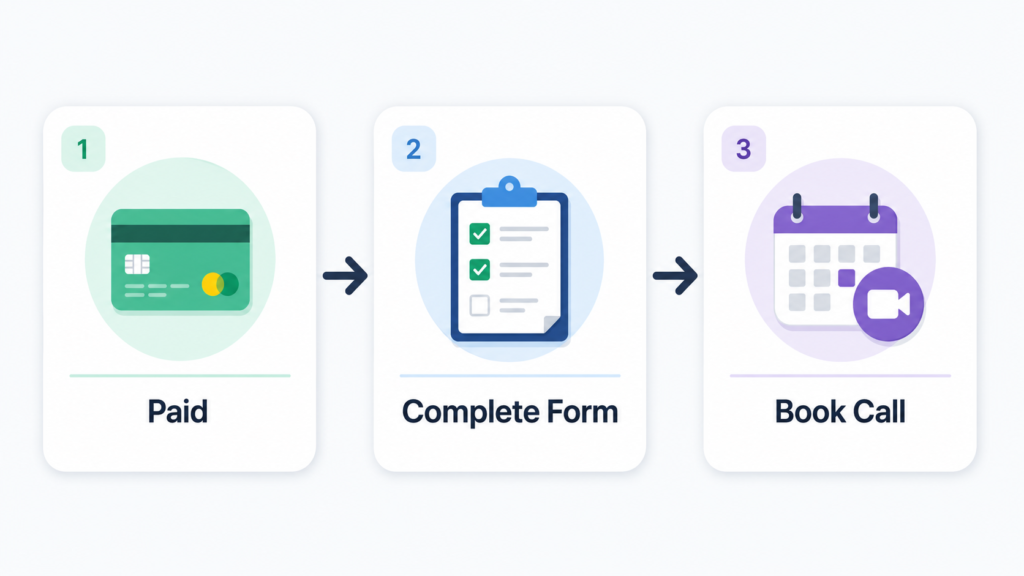
And GoHighLevel automatically follows up whenever someone stops halfway through the process.
Workflow 3: Onboarding Call Confirmation and Reminders
The third workflow can be called:
Onboarding Call Confirmation + Reminders
The trigger happens when the client books their onboarding appointment.
Once triggered, the automation should:
- Update the pipeline
- Send an appointment confirmation
- Send email reminders
- Send SMS reminders
- Include the video meeting link
Move the client into the:
Onboarding Call
pipeline stage.
Then send confirmation messages through SMS and email.
After that, create reminders before the appointment.
For example:
- 24 hours before
- A few hours before
- Shortly before the meeting
Inside these reminders, include the client's meeting link.
Depending on your setup, this could be:
- Zoom
- Google Meet
Because the calendar is connected directly to your meeting platform, the correct video call information can be automatically included in the messages.
The Complete Automated Client Onboarding Flow
Once everything is connected, your onboarding process looks like this:
This gives you a simple, repeatable onboarding system that can run with very little manual intervention.
Instead of chasing every new client individually, GoHighLevel handles the repetitive parts for you.
You only need to step in when human interaction is actually necessary.
Final Thoughts
A good client onboarding system should do three things:
- Collect everything you need.
- Tell the client exactly what to do next.
- Automatically follow up when they do not do it.
GoHighLevel allows you to combine forms, payments, calendars, pipelines, email, SMS, and workflows into one onboarding process.
For a law firm, agency, SaaS company, or service business, this can significantly reduce administrative work while creating a much more consistent experience for every new client.
If you do not have a GoHighLevel account yet, get trial here